进阶 PM2
PM2 大大简化了 Node 任务操作,除了简单的应用外,我们还可以做一些有趣的事情。本节我们来探讨一下 PM2 的平滑启动以及数据监控。
如果你还不了解 PM2,可以先看看PM2 初体验,或者查看PM2 用法简介。
一、PM2 两种启动方式
1.cluster_mode:用 cluster 来做负载均衡,我们不需要做任何代码的改动。
2.fork_mode:用 fork 模式启动(默认),这可以允许我们通过改变 exec_interpreter 参数,启动 php 或者 python 服务。
Node.js 给我们提供了 cluster 模块,它可以生成多个工作线程来共享同一个 TCP 连接。
二、实时扩展集群
任何时候,如果我们需要增加工作线程的数量,可以通过 pm2 scale <app name> <n> 来对集群进行扩展。参数 <n> 指定工作线程的数量,被用来增加或减少集群数。
补充:可以通过 pm2 scale app +3 的方式来指定要增加多少工作线程。
PM2 的 reload <app name> 功能将依次重启所有的工作线程。每一个线程会等待在新的线程创建之后才会被终止掉,因此,当你在产品环境部署新的代码时,Server 会不间断地一直保持运行。
三、平滑重启
1.fork 模式1
2
3
4
5
6
7
8
9
10
11
12
13
14
15
16
17
18
19
20{
"apps" : [{
"name" : "pc",
"script" : "jartto-server.js",
"kill_timeout" : 3000,
"instances": 2,
"log_date_format": "YY-MM-DD HH:mm:ss Z"
}]
}
const httpServer = server.listen(port, error => {
if (error) {
throw error;
}
process.send('ready');
});
process.on('SIGINT', () => {
httpServer.close(error => {
process.exit(error ? 1 : 0);
});
});
2.cluster
在集群模式下,有一个默认系统可在应用程序接受连接时将每个集群设置为就绪。还有一个超时,默认为 3000 毫秒,我们可以使用 ecosystem 文件中的 listen_timeout 属性进行设置。
生成 ecosystem.config.js1
pm2 ecosystem
输出日志:1
2
3[PM2] Spawning PM2 daemon with pm2_home=/Users/jartto/.pm2
[PM2] PM2 Successfully daemonized
File /Users/jartto/Documents/project/ecosystem.config.js generated
简单示例:1
2
3
4module.exports = {
apps: [{}, {}], // 存放每一个进程的配置信息
deploy: {} // 包含部署配置的对象
}
之后,就可以通过 startOrRestart 来启动了:1
2
3"scripts": {
"start": "cross-env PATH_TYPE=test pm2 startOrRestart ecosystem.config.js --only jartto-test --env test",
}
关于 apps 和 deploy 下面我们来细致聊一聊。
四、apps 部分
上面 ecosystem.config.js 会生成一个简单的模版,为了更好的掌握,我们来看看更全的一些配置:1
2
3
4
5
6
7
8
9
10
11
12
13
14
15
16
17
18
19
20
21
22
23
24
25
26
27
28
29module.exports = {
apps : [{
name: 'Jartto-test', // 进程名称
script: './node_modules/nuxt-start/bin/nuxt-start.js', // 启动脚本地址
args: '-p 8888 -H 0.0.0.0', // 启动的配置
cwd:
instances: 4,
autorestart: true,
watch: false,
max_restarts: 5,
max_memory_restart: '1G',
env: {
NODE_ENV: 'development'
},
env_production: {
NODE_ENV: 'production'
}
}],
deploy : {
production : {
user : 'node',
host : '212.83.163.1',
ref : 'origin/master',
repo : 'git@github.com:repo.git',
path : '/var/www/production',
post-deploy : 'npm install && pm2 reload ecosystem.config.js --env production'
}
}
};
参数意义:
- apps:json 结构,apps 是一个数组,每一个数组成员就是对应一个pm2中运行的应用
- name:应用程序的名称
- cwd:应用程序所在的目录
- script:应用程序的脚本路径
- exec_interpreter:应用程序的脚本类型,这里使用的 shell,默认是 nodejs
- min_uptime:最小运行时间,这里设置的是 60s 即如果应用程序在 60s 内退出,pm2 会认为程序异常退出,此时触发重启 max_restarts 设置数量
- max_restarts:设置应用程序异常退出重启的次数,默认 15 次(从0开始计数)
- exec_mode:应用程序启动模式,这里设置的是 cluster_mode(集群),默认是 fork
- error_file:自定义应用程序的错误日志文件
- out_file:自定义应用程序日志文件
- pid_file:自定义应用程序的 pid 文件
- watch:是否启用监控模式,默认是 false。如果设置成 true,当应用程序变动时,pm2 会自动重载。这里也可以设置你要监控的文件。
五、deploy 部分
1.生成公钥1
2ssh-keygen -t rsa
ssh-copy-id jartto@server.com
补充说明一下:ssh-copy-id 命令可以把本地主机的公钥复制到远程主机的 authorized_keys 文件上,实现免密码登陆。
2.配置 ecosystem 文件1
2
3
4
5
6
7
8
9
10
11
12
13
14
15
16
17
18
19
20
21
22
23
24
25
26
27
28
29
30
31
32
33
34
35module.exports = {
apps: [{
name: "app",
script: "app.js"
}],
deploy: {
// "production" is the environment name
production: {
// SSH key path, default to $HOME/.ssh
key: "/path/to/some.pem",
// SSH user
user: "Jartto",
// SSH host
host: ["192.168.0.13"],
// SSH options with no command-line flag, see 'man ssh'
// can be either a single string or an array of strings
ssh_options: "StrictHostKeyChecking=no",
// GIT remote/branch
ref: "origin/master",
// GIT remote
repo: "git@github.com:jartto/repository.git",
// path in the server
path: "/var/www/jartto-repository",
// Pre-setup command or path to a script on your local machine
'pre-setup': "apt-get install git ; ls -la",
// Post-setup commands or path to a script on the host machine
// eg: placing configurations in the shared dir etc
'post-setup': "ls -la",
// pre-deploy action
'pre-deploy-local': "echo 'This is a local executed command'",
// post-deploy action
'post-deploy': "npm install",
},
}
}
命令很简单,都有注释,这里就不赘述了。
3.是时候启动了1
2
3
4
5
6
7
8
9
10
11# Setup deployment at remote location
pm2 deploy production setup
# Update remote version
pm2 deploy production update
# Revert to -1 deployment
pm2 deploy production revert 1
# execute a command on remote servers
pm2 deploy production exec "pm2 reload all"
更多配置项:1
2
3
4
5
6
7
8
9
10pm2 deploy <configuration_file> <environment> <command>
Commands:
setup run remote setup commands
update update deploy to the latest release
revert [n] revert to [n]th last deployment or 1
curr[ent] output current release commit
prev[ious] output previous release commit
exec|run <cmd> execute the given <cmd>
list list previous deploy commits
[ref] deploy to [ref], the "ref" setting, or latest tag
了解更多,请参考官方文档。
六、环境变量
pm2 通过在配置文件中通过 env_xx 来声明不同环境的配置,然后在启动应用时,通过 --env 参数指定运行的环境。一个简单的示例可能如下:1
2
3
4
5
6
7
8
9
10
11
12"env": {
"NODE_ENV": "production",
"REMOTE_ADDR": "http://www.jartto.wang/"
},
"env_dev": {
"NODE_ENV": "development",
"REMOTE_ADDR": "http://dev.jartto.wang/"
},
"env_test": {
"NODE_ENV": "test",
"REMOTE_ADDR": "http://test.jartto.wang/"
}
七、负载均衡
PM2 提供了强大的负载能力,我们可以通过如下命令来开启:1
2pm2 start app.js -i 3 # 开启三个进程
pm2 start app.js -i max # 根据机器CPU核数,开启对应数目的进程
八、数据监控
PM2 提供了一个数据监控命令:pm2 monit,执行命令后,大概界面如下: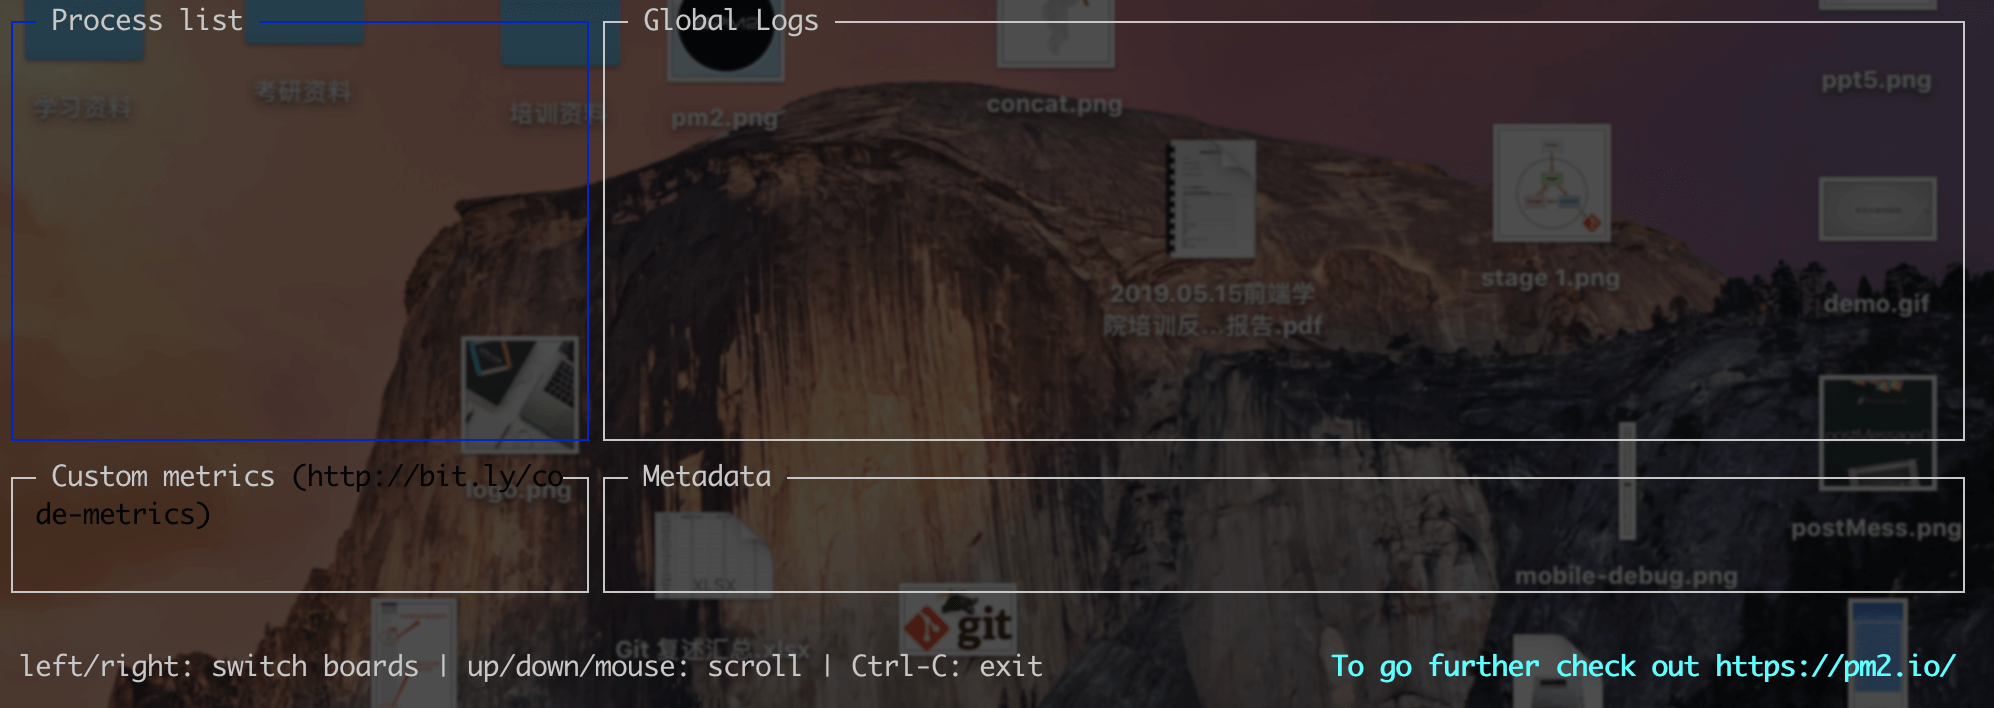
看起来不错,可惜并不实用。大家可能发现了,在实际场景下,我们线上环境会有 N 台服务器,你会一台台上去看监控数据吗?
显然,我们碰到了另一种场景,那么如何才能统一监控呢?
不要着急,PM2 为我们提供了另外一种方式,通过在 Server 端运行命令:pm2 web,我们可以在该机器启动一个监听服务: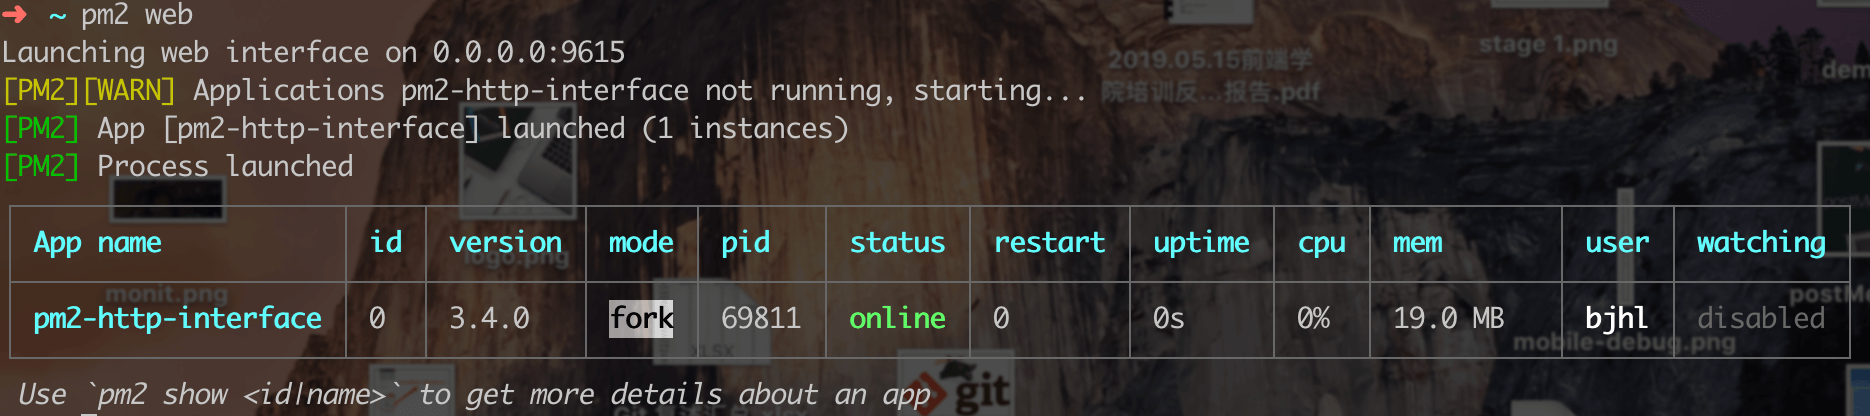
之后,你可以通过 主机 IP:9615 来获取数据,如下图:
获取数据可以通过客户端轮询,或者是服务端 Socket 推送,It’s up to you!
最后,我们来看看数据格式: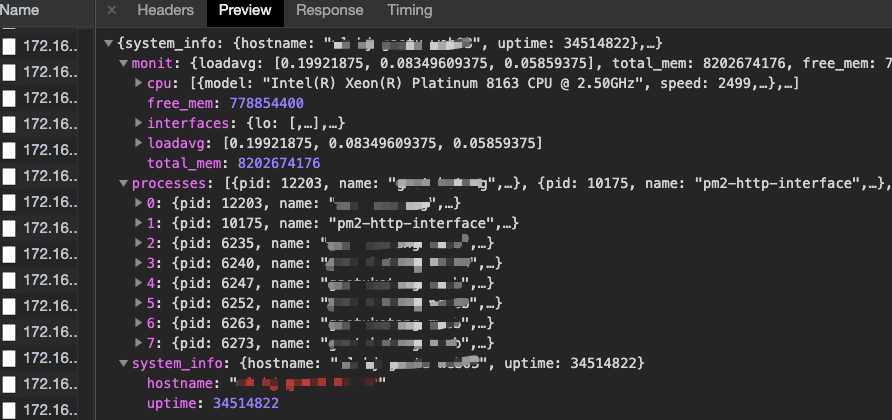
有了数据,那么可视化岂不是小菜一碟,我们就可以在本地实时监控如下数据:
1.服务器内存情况;
2.CPU 使用情况;
3.各个站点服务情况,是否正常运转,是否报错,是否频繁重启等;
4.服务器平均负载;
…
九、重置状态
既然通过 PM2 来监控数据了,那么我们肯定希望每次的数据是准确的,所以这时候就可以使用:1
pm2 reset jartto-test
来重置服务状态。
十、最终效果
有了数据,可视化就非常容易了,我们来看一个简单的示例: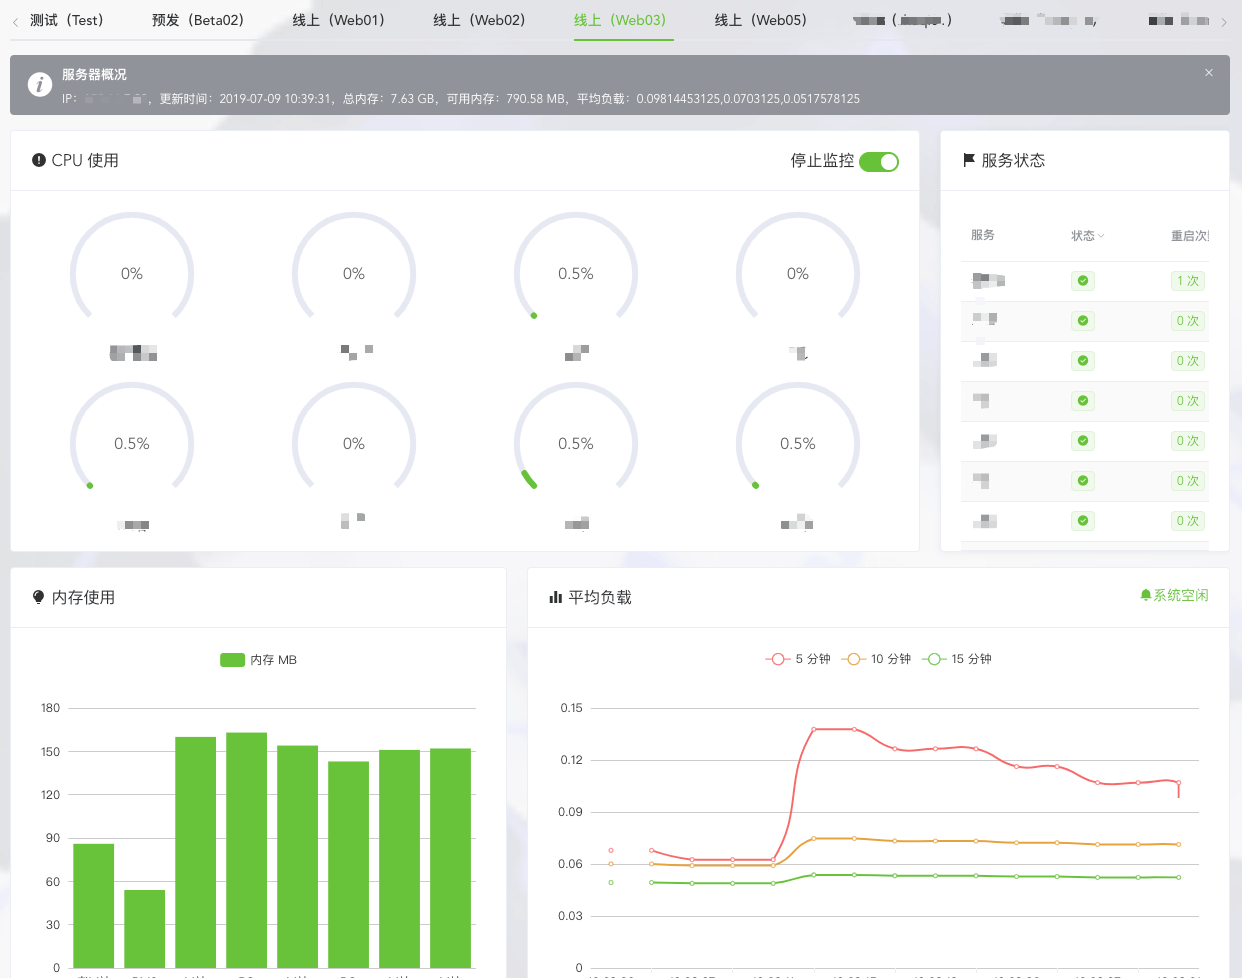
当然,你可以做的更好,快发挥你创造性,做一些有趣的事情吧!
